Table of Contents
Two-Point Starter
A two-point starter is used for starting DC series motors. It is a simple device that helps control the starting current to prevent damage to the motor.
A Two-Point Starter is a simple device used FOR safely starting a DC series motor. When a motor starts, it can draw a large amount of current, which can damage the motor or the power supply. The two-point starter prevents this by adding a resistor in the circuit at the beginning, which reduces the starting current. As the motor speeds up, this resistor is gradually removed.
It’s called “two-point” because it has two main connections:
- One to the positive terminal of the power supply.
- One to the field winding of the motor.
This starter also includes safety features like:
- A handle to control the starting process.
- A no-volt coil that turns off the motor safely if the power fails.
- An overload release protects the motor from drawing too much current.
External Terminals:
- L (Line): This terminal is connected to the DC power supply.
- F (Field): This terminal is connected to the field winding of the motor.
When the motor is started, the handle of the starter is moved step-by-step from the OFF to the ON position. This gradual increase in connection reduces the initial high current that could otherwise damage the motor windings.
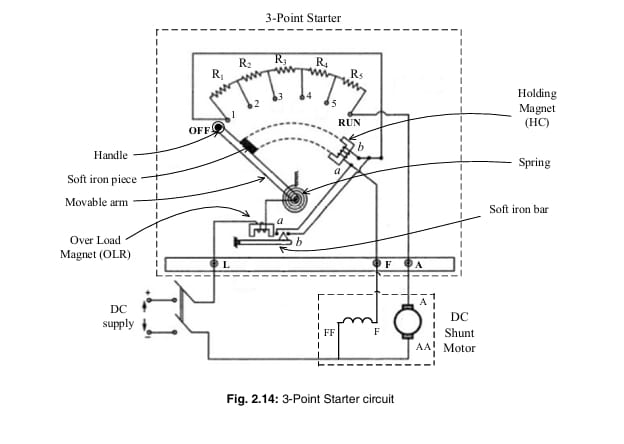
📌 Note: A two-point starter does not have overload protection, unlike a three-point starter used for DC shunt motors.
Construction of Two-Point Starter
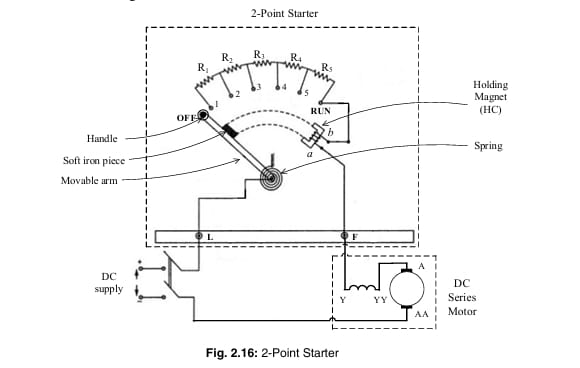
A two-point starter is used primarily for starting and controlling the speed of a DC series motor. It ensures that the motor receives a reduced voltage at the time of starting to avoid a high inrush of current. The name “two-point” refers to the two main terminals or connection points: one to the positive terminal of the supply and the other to the field winding of the motor.
Main Components of a Two-Point Starter:
- Starting Resistor (Rheostat): This is a variable resistance connected in series with the armature winding. It limits the high starting current and is gradually removed from the circuit as the motor picks up speed.
- Handle or Lever Arm: It is a movable arm that the operator uses to manually adjust TO starting resistor. As the lever is moved from the OFF to the ON position, the resistance is decreased step by step.
- Field Terminal (F): This terminal is connected to the field winding of the motor.
- Line Terminal (L): This is connected to the positive terminal of the DC supply.
- Overload Release (OLR): It is a protective device that trips the circuit if the motor draws excessive current beyond a safe limit. It ensures the safety of the motor against overloading.
- No-Volt Coil (NVC): It is an electromagnet connected in series with the field winding. Its function is to hold the starter handle in the ON position as long as the supply is present. If the supply voltage drops or fails, the magnetic force of NVC disappears and releases the handle back to the OFF position, thereby protecting the motor from single phasing or restarting automatically

2. Working of Two-Point Starter
When a DC series motor is started directly without any resistance, it draws a very high current due to low armature resistance. To prevent this, a two-point starter is used.
Here’s how it works:
- The handle is initially in the OFF position.
- As the handle is pushed toward the ON position, it passes through contact studs connected to resistors.
- This gradually decreases the resistance in the circuit and increases the voltage across the motor.
- Once the handle reaches the final position, full supply voltage is applied across the motor.
As the motor picks up speed, the armature back EMF builds up, reducing the current naturally.

Diagram of Two-Point Starter
Here’s a simple layout of a two-point starter:
  + DC Supply
      |
      |          ------------------------
      |          |                      |
      |         [L]------R1------R2------*---------> To Motor Armature
      |                                |
[F]-------------------------------> To Field Winding- L = Line terminal (connects to supply)
- F = Field terminal (connects to field winding)
- R1, R2 = Starting resistances (limit the initial current)
- Handle/Arm ( * ) = Moves across the resistances to connect the motor smoothly
The handle is moved step-by-step from OFF to the RUN position, bypassing resistors one by one.
What Happens During the start?
When a DC motor starts, a starting resistance (often made up of multiple resistors like( R₁ + R₂ + R₃ + R₄ + R₅) is placed in series with the armature winding. This is done to limit the armature current and protect the motor from damage due to high inrush current.
As the motor begins to rotate and gains speed, the resistors are gradually cut out of the circuit. The current flows through the series field winding, armature winding, and a component called the holding coil (HC).
Once the moving arm of the starter touches the final stud marked ‘RUN’, the holding magnet is activated. It pulls and holds a soft iron piece, locking the arm in place. At this stage:
- The motor has reached its normal operating speed
- The starting resistors are completely removed
- The motor receives its full rated voltage for regular operation
Protection from The No-Load
What if the motor suddenly loses its load? In that case, the armature current (Ia) drops. This makes the holding magnet weak, and it can no longer hold the starter arm against the spring force. As a result, the arm snaps back to the ‘OFF’ position, disconnecting the motor from the supply.
This protection is crucial, especially for DC series motors, because they can overspeed dangerously when running with very light or no load. This kind of starter is called a No-Load Release Starter.
Some advanced two-point starters also come in drum controller form. They help in starting, speed control, and speed reversal. The resistors used in these starters are designed to carry full load current for long durations, especially during low-speed operation.
Advantages of Two-Point Starter:
- Simple Design
The construction and working of a two-point starter are very simple, making it easy to use and maintain. - Cost-Effective
It is cheaper compared to other types of starters, like the three-point starter. - Effective for DC Series Motors
Specifically designed for DC series motors, it provides the basic protection needed during startup. - Controls Starting Current
Helps limit the initial high current when the motor starts, protecting the motor windings.
Disadvantages of Two-Point Starter:
- No Overload Protection
It does not offer protection against overload conditions, which can lead to motor damage. - Manual Operation
Requires the operator to manually move the starter handle, which can be inconvenient and risky. - Not Suitable for All Motors
It is only suitable for DC series motors, and cannot be used for shunt or compound motors. - Limited Safety Features
Lacks advanced safety features like no-voltage release or overcurrent protection found in more modern starters.
Applications of Two-Point Starter
✅ Used to start DC series motors safely.
✅ Common in cranes, hoists, and electric traction where series motors are often used.
✅ Suitable for low-cost and basic DC motor applications where overload protection is not a primary concern.
Modern Starters: Smarter and Safer
Traditional starters use resistors to control the starting current. But today, we also have solid-state starters that use modern electronics like thyristors and choppers. These can give the motor a smoother, controlled start by adjusting the voltage electronically. They are safer, more efficient, and perfect for modern-day motors.

FAQ
What is a two-point starter?
A two-point starter is a device used to safely start and control the speed of a DC series motor by limiting the initial high starting current.
Why is it called a “two-point” starter?
It is called a two-point starter because it has two main terminals or connection points: one for the positive terminal of the supply and the other for the armature terminal of the motor.
How does a two-point starter work?
When the handle is moved from the OFF to ON position, resistance is gradually removed from the circuit. This allows the current to increase slowly. As the motor picks up speed, back EMF builds up and naturally limits the current.
Can a two-point starter be used with shunt motors?
No. Two-point starters are specifically designed for DC series motors. For shunt or compound motors, three-point or four-point starters are recommended.
What is the role of resistance in the starter?
The starting resistance limits the inrush current at the time of starting, preventing potential damage to the motor windings.
